The MacroFab Platform has robust Bill of Materials Management options
The Bill of Materials tab of the PCB interface allows you to manage the list of components that will be placed on your PCB during assembly, while also detailing the part costs and labor prices.
The Bill of Materials tab will not be populated until you’ve uploaded your bill of materials, either by uploading a supported EDA source file, or uploading a XYRS File, or a compatible Bill of Materials file. For more information on file formats and what files we support, see Required Design Files.
Once you have uploaded the required design files you will be able to edit your bill of materials in the platform.
The Bill of Materials Tab Overview
Part Filters
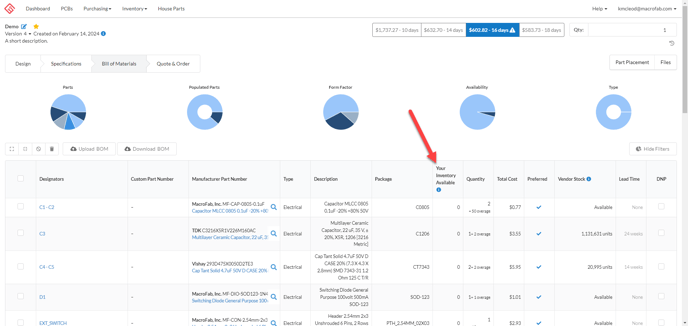
At the top of the Bill of Materials tab is a set of pie chart filters. These filters show the parts breakdown of your PCB, populated and unpopulated parts, form factors of selected parts, where the parts are sourced, and which parts are available to be purchased. Clicking on the slices of the pie chart filters will automatically filter your bill materials to component groups that match the description.
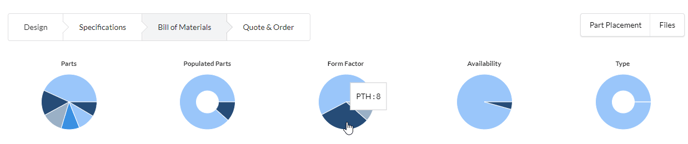
Multiple filters can be selected at any given time. Selecting the "X" under the filter will reset it. On the right side under the filters there is a Hide Filters button which hides the filters giving you more room to work on the Bill of Materials.
Group Actions
Under the left side of the pie chart filters there are four group action buttons. These buttons from left to right are ungroup selected items, group selected items, do not place selected items, and delete selected items.
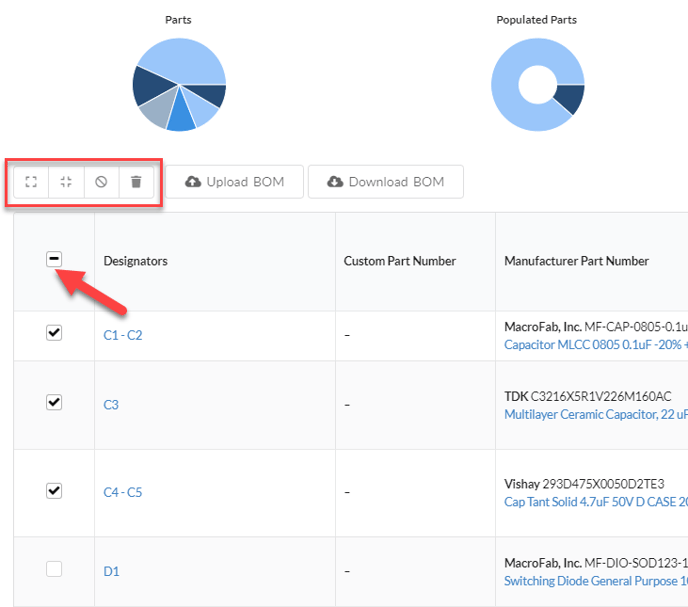
| Ungroup selected items | Separates grouped designators into separated line items | |
| Group selected items | Combines line items into a group. ⚠️ If there is conflicting data, it will be cleared (see note below) | |
| Do Not Place selected items | Adds the DNP flag to the selected items. This has to be cleared item by item. | |
| Delete selected items. | Removes the line items from the BOM. This is final so be careful when deleting items. | |
| Select All/None | Used to select all or none of the items. Use with delete to clear your BOM. |
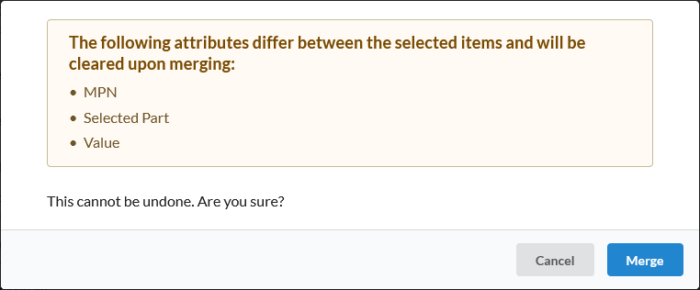
⚠️If the line items you group have different attributes, the platform will notify you which attributes conflict and then clear them upon grouping.
Line Items
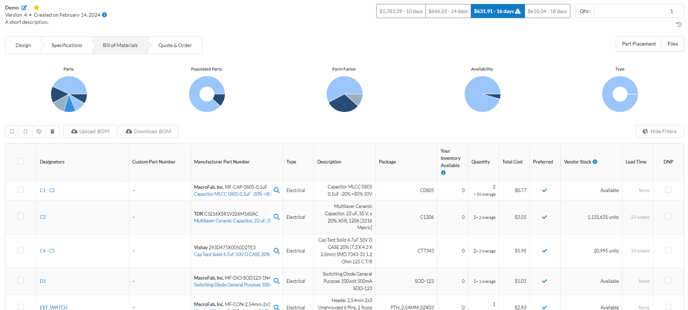
All of the components in your bill of materials are grouped into line items based on the designator's Package and Value field that was supplied in your bill of materials. Each line item will look similar to this:

Each line item row displays the Designators associated with the line item group, the Manufacture Part Number (MPN), component Value, the Package of the part, Your Inventory Available the Quantity of parts needed, the Total Cost including assembly for the line item, the Stock available from our distributors, and the Lead Time of the part.
Clicking the line item will expand the line item to show more details. When the line item is expanded, the MPN field, Package, and Value at the top side of the expanded line item are editable. Editing these fields will change that attribute for all the Designators in the group. Clicking the X to the right of the expanded line item will collapse the line item.

On the left side of the expanded line item there are 3 icons. These change what is displayed in the expanded line item.

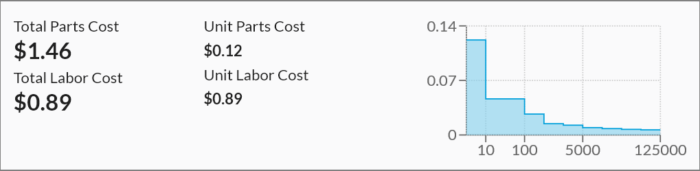
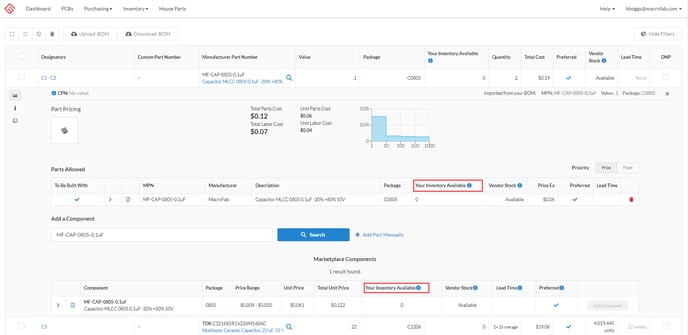
1. Part Pricing information
This will show the breakdown of the part cost, part placement labor, and the price break graph of the part. The part price and labor cost is tied to the Quantity number at the top right of the PCB interface and will reflect the price breaks you receive on this line item. Changing the quantity of boards at the top will in real time change the pricing displayed here.
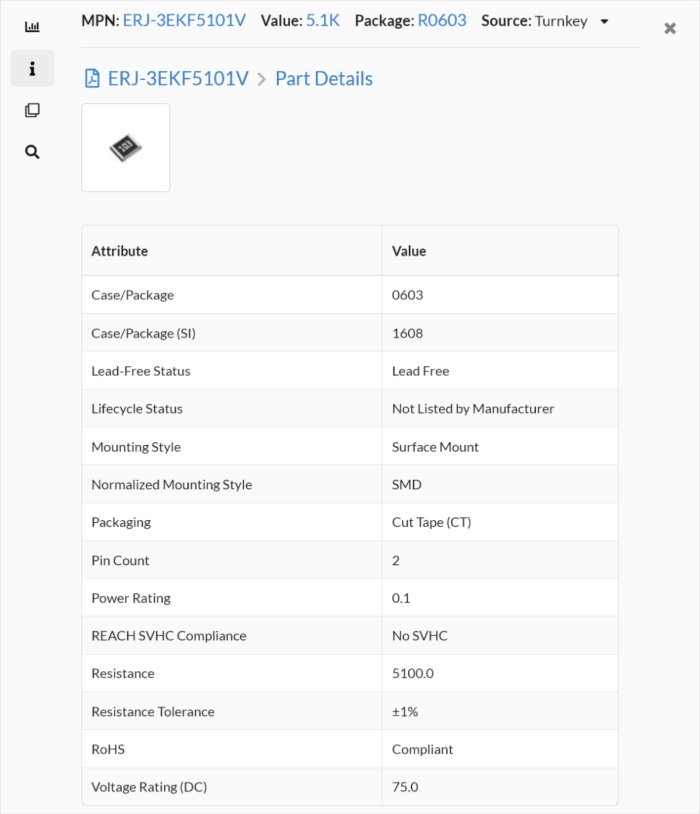
2. Part Attributes
Everything MacroFab knows about the selected part will be displayed in the Part Details view.
3. Group Management of Designators
Here you will be able to move individual designators to other line item groups, create a new line item groups, or indicate whether individual components in this group should be populated or not (DNP).
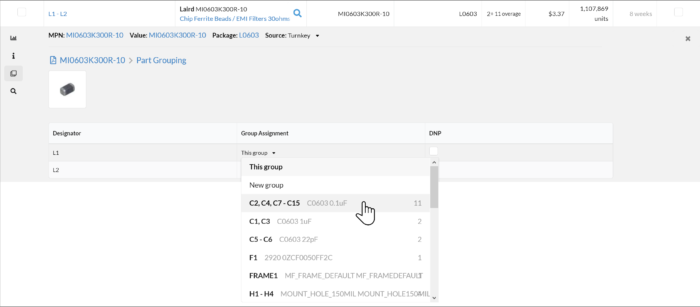
To move a component from one group to another, for example when changing the value of a resistor to that of another set of resistors, simply click on the designator of the group to open up the group assignment list. The display will include a drop-down for assignment. Select the new component group to assign this component to.
If you want to create a new line item group for the designator (i.e. give it a value and footprint combination not shared by other designators), use the Assignment drop-down to select “New Group”.
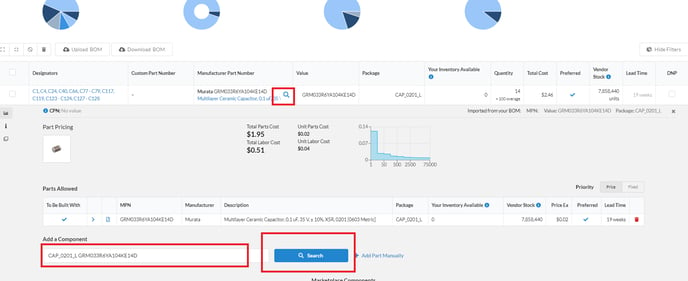
4. To search for a part click the Spyglass Icon which will expand the BOM. You will then see a blue search button and a field
Sourcing your Parts
MacroFab has made sourcing your parts easier than ever.
The Customer-Furnished Material Release
Overview
We're pleased to announce a more streamlined ordering experience within the MacroFab platform made possible by simplifying part-sourcing definition.
MacroFab has decoupled the burden of defining part-sourcing information within the Bill of Materials, empowering customers to configure and iterate on their designs faster than ever before.
Part sourcing-sourcing definition will now take place partially on the Quote & Order page with the remainder happening after an order has been placed.
This update to our platform reduces friction customers may experience during the design configuration process and ultimately enables further go-to-market agility.
BOM
On the BOM screen, we’ve added a new column Your Inventory Available. The values in this column reflect the total quantity of each part you have available for use in your MacroFab inventory.
This new column is also present when expanding a BOM row and when searching for a component.
Quote & Order
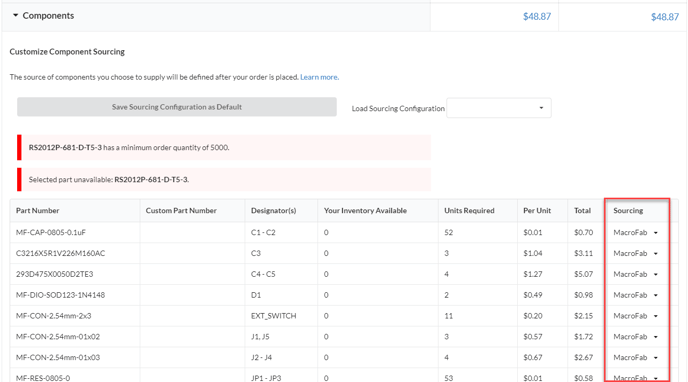
The first step in defining part-sourcing information now exists on the Quote & Order page under the Components section.
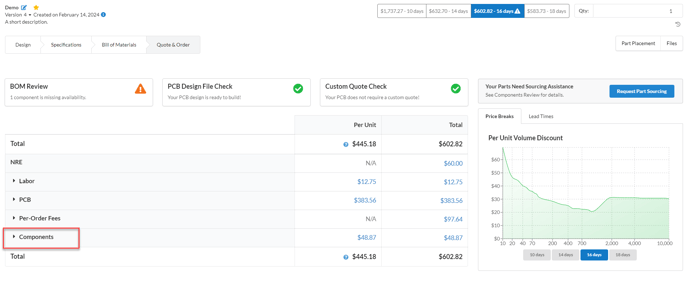
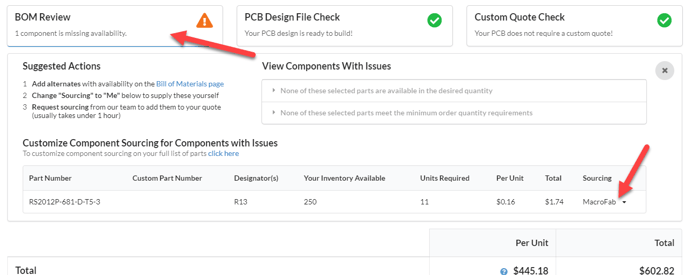
If you have parts with no market availability you will also see the option to specify sourcing in the BOM Review box.
After expanding the Components section a table will be displayed with each part in the order.

Each component in this table will need to have its source specified under the Sourcing column.

The two options to choose from are MacroFab, and Me.
Choose MacroFab if you would like to have that part sourced turnkey by MacroFab.
Choose Me if you would like to send (consign) the part to MacroFab or pull it from your MacroFab inventory.
To save your part-sourcing selections for the next time a design is ordered simply select the Save Sourcing Configuration as Default button.
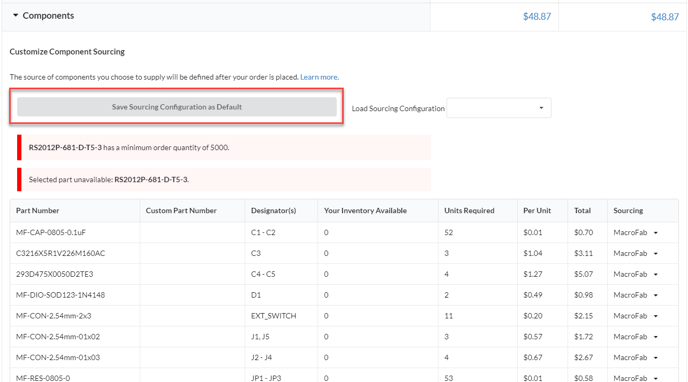
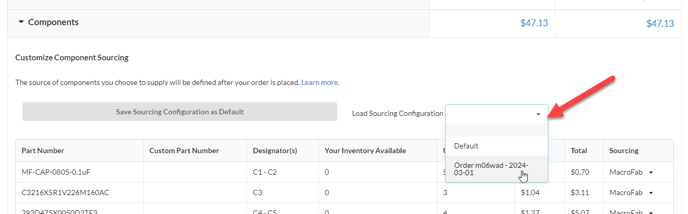
The sourcing configuration from previous orders of this design will also be selectable here.
If the order does not contain one or more components with a specified source of Me then your part sourcing definition work is done and you may proceed with placing your order as normal.
If however, the order does contain one or more components with a specified source of Me then you will need to specify whether you will ship (consign) the component to MacroFab or you will pull it from your available MacroFab inventory after you’ve placed the order.
With this new release, we've streamlined our existing consignment fee into a unified fee to account for all handling of customer-furnished material.
This fee will vary based on the service tier selected and the lead time required.
Parts to Supply
After order placement, if the sourcing of one or more parts was defined as Me, you must now specify if those parts are to be pulled from available inventory or if they will be sent (consigned) to MacroFab.
This allocation will take place on the new Parts to Supply page.
Please note, if your order does not contain one or more parts with a source of Me this page will not exist for the order.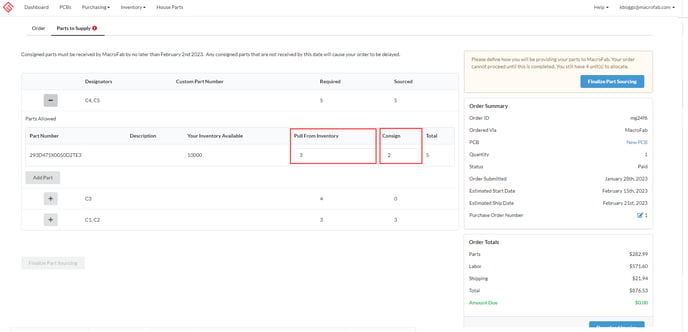
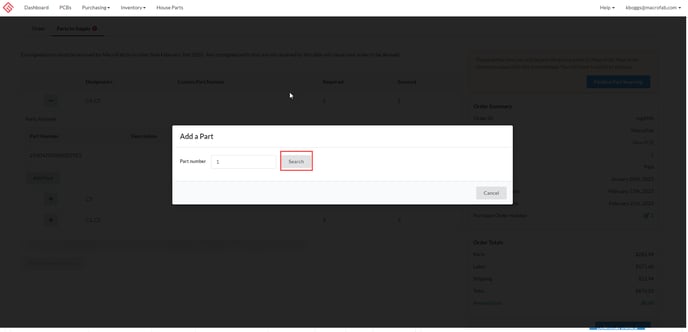
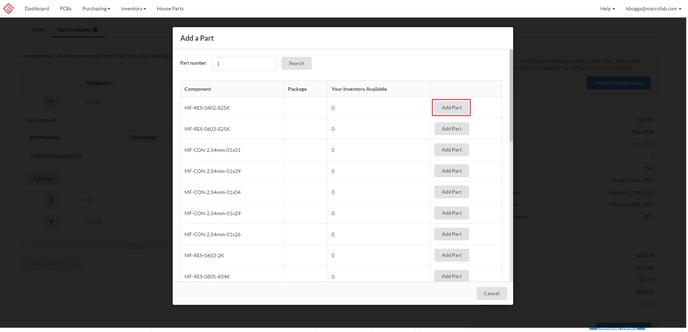
Parts can also be added to your alternate list from this page. Adding a part here will also update the alternate list back on the Bill of Materials page.
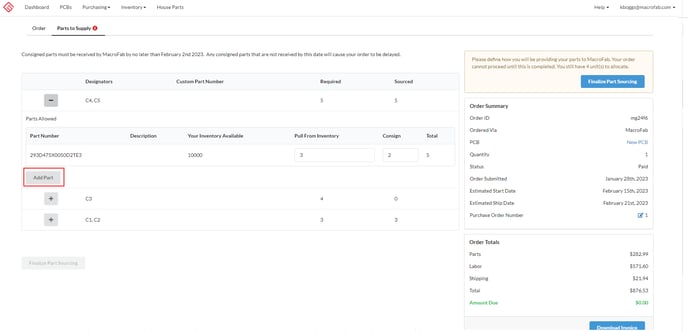
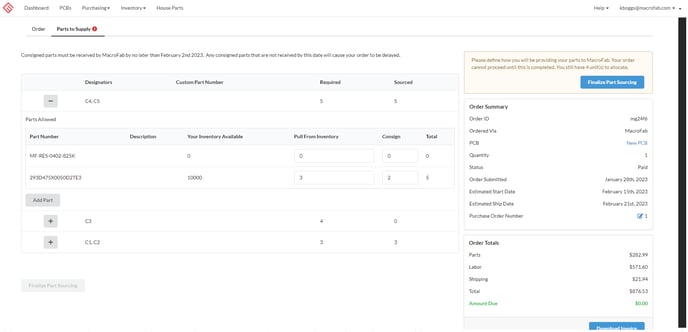
Once you’ve allocated the required quantity for each designator group the last thing to do is select the Finalize Part Sourcing button at the bottom of the page.
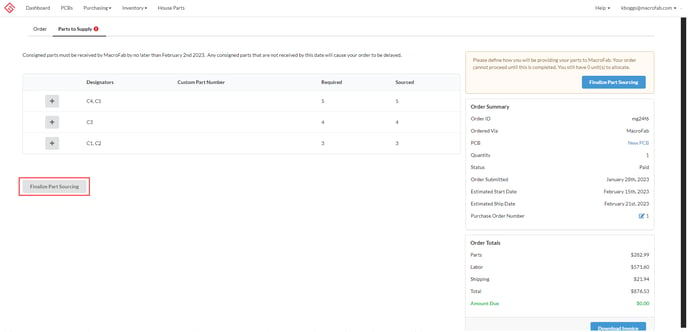
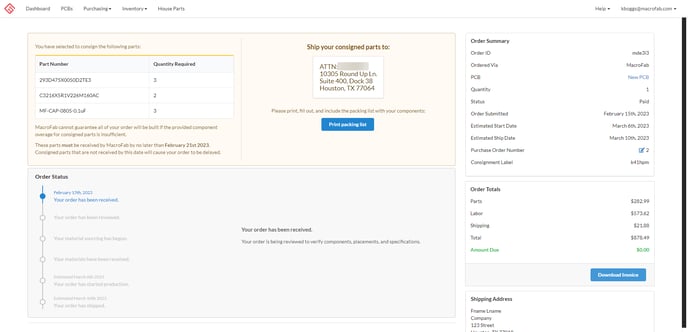
Instructions for consigning parts will be shown (if applicable) after sourcing has been finalized.
FAQ
- What happens to the sourcing configuration of already existing designs?
-
Sourcing will be set to MacroFab for all parts.
-
- Can I leave the Parts to Supply page and come back to it later before I’ve finalized my part sourcing?
-
-
Yes, any edits made to your sourcing configuration will be saved allowing you to pick up exactly from where you left off.
-
Please note, your order cannot proceed until you’ve finalized your part sourcing and have sent all consigned parts to MacroFab (if applicable).
-
-
What happens if I edit the contents of an alternate list on the Parts to Supply page?
-
Edits will be reflected back on the Bill of Materials page.
-
If the alternate list has been assigned a custom part number (CPN) then all designs using the CPN will be updated.
-
-
How do I remove a component from an alternate list on the Parts to Supply page?
-
You can remove components from alternate lists back on the Bill of Materials page.
-
-
I marked a part as to be sourced by Me but now that I’ve placed the order I would actually like MacroFab to source it for me. What do I do?
-
Please email support@macrofab.com describing your situation and our customer care experts will promptly offer assistance.
-
Adding a New Component to the Bill of Materials
At the bottom of the Bill of Materials tab there is a section to add new parts to the list. Fill out the part's Designator, MPN, Package, and Value then click the "Add Part" button to save it.

After you add a new component to the Bill of Materials you will need to add the placement information for the part. Find the part you added to the list and expand the line item. Then click the red triangle in the bottom left of the expanded window.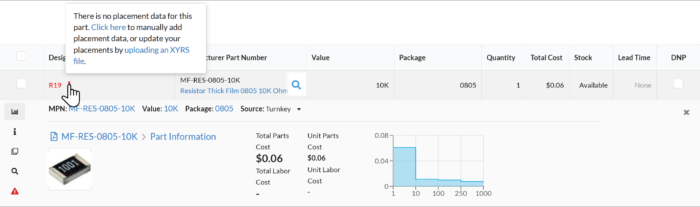
The window will change displaying all the placement data needed: X Origin, Y Origin, X Size, Y Size, Rotation, Side, Type. All measurements are in mils and degrees. Click the blue "Add Placement" button when completed.
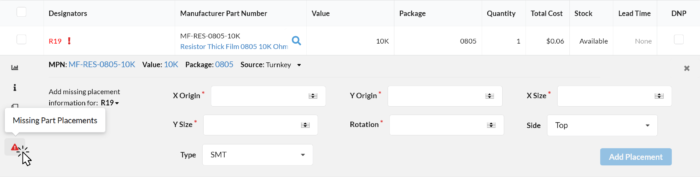
X and Y Origin is the location of the center or centroid of the part/component on the PCB. Units is mils.
X and Y Size is the bounding box of the square around the part. An Example would be an 0603 resistor would be 60 mils by 30 mils in size. Units is mils.
Rotation is the angle the part is at on the PCB. Units is degrees.
Side is which side the part/component is on. Top or Bottom.
Type is what kind of part it is. Surface Mount (SMT) or Through hole (PTH).
Notes
- The bill of materials interface only supports unique designators. Uploading a bill of materials file with multiple identical designators will cause an error.
- All your line items need to have selected parts. When you upload a bill of materials file the interface can auto select parts to speed up part management. Information about that can be found in this article.
- The interface automatically calculates the overage for parts and how many will be ordered. Information about overage can be found here.
Support
If you have questions regarding the bill of materials interface or ran into a problem please contact our support team.